Click to Skip Ahead
It can be a tough balance between letting your cats explore the outdoors and keeping them safe. A simple fence isn’t enough if you want to give your cat the freedom to explore your backyard without opening the door to the neighborhood. It might even become a roadway for a curious kitty to explore.
However, if you have a fence at least six feet tall, a fence roller or barrier might be a good solution. These are often used to keep coyotes and other wildlife out and your pets in. And best of all, there are lots of options for a DIY one. Here are four plans for DIY cat proof fence rollers.
The 4 DIY Cat Proof Fence Roller Plans
1. Cheap, Easy PVC Pipe Cat Proof Fence Roller by GoJo DIY & Vlogs
| Materials: | Storm drain PVC pipe, storm drain brackets |
| Tools: | PVC cutter (or cut in store), bracket installation tools |
| Difficulty Level: | Easy |
Although any roller fence is a big project, this clever solution is probably the easiest. Rather than building a complex roller-in-roller solution, this video tutorial uses PVC pipes and brackets applied horizontally just inside the lip of each fence section. The poster recommends using the thick PVC used for storm drains. Since this PVC is applied on the inside lip of the fence, it’s also a more discreet solution that can be good if you have irritable neighbors or HOAs who might complain about sticking PVC on top of your fence.
However, depending on your cat’s athletic ability, it’s possible that they could learn to jump over the PVC and land on top of the fence with time.
2. Smooth Rolling PVC Fence for Cats by mrfadzli yusoff
| Materials: | 2- or 3-inch PVC, wood scraps, 3” screws or nails, L-brackets, wood glue |
| Tools: | Drill, jig saw, sandpaper, PVC cutter |
| Difficulty Level: | Easy to moderate |
This PVC roller isn’t too difficult, but it can be a bit tricky to get it to work correctly. The genius of this DIY is in the rolling system. Each PVC section is plugged with a round piece of wood with a hole drilled into it, and then a long screw that’s a little too small for the hole is used to mount it to the fence. The result is a very simple roller that moves way more freely than other rollers in the same price range. The only drawback is that it can take some fiddling with a jigsaw and sandpaper to get a wood “plug” that fits perfectly. With a little patience, though, you’ll have an awesome DIY solution.
3. Double Layer Roll Bar Cat Fence by Your Sassy Self
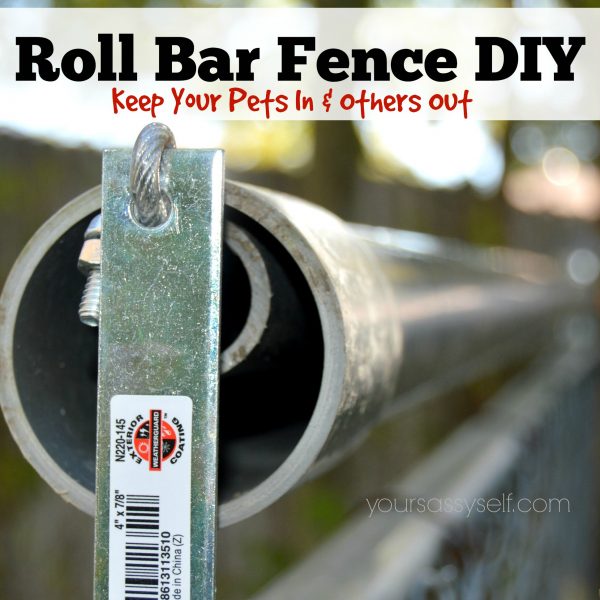
| Materials: | 1” and 3” PVC, steel/braided wire, L-brackets, crimps, wire anchor locks |
| Tools: | Wrench, hacksaw, wire cutters, electric drill, tape measure |
| Difficulty Level: | Easy |
Instead of fiddling with woodworking, this fence roller uses two layers of PVC to make the layers—a 3” pipe that rotates freely around a 1” pipe. If you’re a paint-by-numbers kind of person, you’ll love the tutorial too—it’s detailed and easy to follow, with instructions for calculating how much you’ll need of each supply and both pictures and videos to help you on your way. Even though this is a slightly more complicated solution than some of the earlier entries on this list, that tutorial will make it super easy, even without much DIY experience.
4. Roller Fence for Brick or Wrought Iron Fencing by Husky Camp
| Materials: | Angle irons/corner braces, masonry anchors (brick) or carriage/TV antenna bolts (wrought iron), steel wire cable, wire rope locks, PVC tubing (1/2” and 1”) |
| Tools: | Power drill (make sure it can drill through the fence), drill bits, screwdriver, PVC cutter, bolt or wire cutters, wrench |
| Difficulty Level: | Easy to moderate |
If you don’t have a wood or plastic fence, no problem! This tutorial uses a roller-in-roller style, but it offers tips for pet-proofing brick and wrought-iron fences instead. You will need a powerful drill that’s up to making holes in your fencing, but the end result is a clean, cat-proof fence. Just remember that a four-foot fence or gate won’t keep your cat in—anything less than six feet and they can jump right over.
And, of course, if your cat can squeeze between the wrought-iron bars, you’ll need to add chicken wire or something similar to stop them from leaving that way.

When a Roller Bar Isn’t Enough
Just because you put a roller bar on top of your fence doesn’t mean that your cat is automatically stuck there. Before you go to the trouble of installing rollers, make sure to take a good look at your backyard. Most cats can easily jump six feet, so a four-foot fence is likely to just be jumped over if your cat can’t land on top.
You also need to be aware of your landscaping—convenient boulders, electric boxes, furniture, and trees can offer climbing routes out or places to jump from. Finally, make sure to check out the base of your fence too. Cats can squeeze through gaps of only a few inches, so it’s important to cat-proof the base of your fence if it doesn’t quite reach the ground.
Other Fencing Options
If you’d rather not have a roller bar, there are other options that you can pick instead. Plastic bird nesting deterrents can be placed on top of your fence to prevent your cat from jumping on it. You can also create an angled barrier. So, 12–18 inches of chicken wire that projects inward from your fence at a 45-degree angle is usually enough to prevent cats from jumping over it.
Finally, you can consider a catio or cat enclosure if you don’t want to cat-proof your whole backyard. These spaces are fully enclosed and can range in size from a few cubic feet to your whole yard. Ideally, they’ll offer a mix of shade, sunlight, and safe hiding places for your cat. Some catios can even be accessed via a cat door from your porch or window so that your cat can enjoy the outdoors safely at any time.
Last Thoughts
Fence rollers take some time and money to install, especially if you have a larger yard, but a DIY process will help you save some money and customize it to your needs. Even though this is a bigger DIY project, you don’t need to be intimidated—none of these projects require any special skills to succeed. With a little patience, you can make the perfect solution for keeping your pet safe.
Featured Image Credit: fantom_rd, Shutterstock

